목차7개 항목
NestJS에서 여러 핸들러에 공통인 로직을 끼워 넣는 장치는 생명주기 순서대로 Middleware → Guard → Interceptor → Pipe → Exception Filter다. 이 노트는 맨 앞의 Middleware와 핸들러를 감싸는 Interceptor를 다룬다. 전체 순서는 NestJS 요청 생명주기에 있다.
Middleware
NestJS의 미들웨어는 라우트 핸들러보다 먼저 호출되는 함수로, 요청·응답 객체와 next()에 접근할 수 있다. 개념은 Express 미들웨어와 같고, @Injectable() 클래스로 만들어 DI를 받을 수 있다는 점이 다르다.
// common/middlewares/logger.middleware.ts  (nest g middleware logger)
import { Injectable, Logger, NestMiddleware } from '@nestjs/common';
import { NextFunction, Request, Response } from 'express';

@Injectable()
export class LoggerMiddleware implements NestMiddleware {
  private logger = new Logger('HTTP');

  use(req: Request, res: Response, next: NextFunction) {
    // 응답이 끝난 시점(finish)에 상태 코드까지 함께 기록
    res.on('finish', () => {
      this.logger.log(`${req.ip} ${req.method} ${req.originalUrl} ${res.statusCode}`);
    });
    next();
  }
}console.log대신 Nest 내장Logger를 쓰면 컨텍스트(HTTP)·타임스탬프·색상이 붙은 일관된 로그가 남는다.- 요청이 들어오는 순간에는 상태 코드를 모르므로
res.on('finish')에서 기록한다.
미들웨어는 @Module의 속성이 아니라, 모듈 클래스가 NestModule을 구현하고 configure()에서 등록한다.
@Module({ imports: [CatsModule] })
export class AppModule implements NestModule {
  configure(consumer: MiddlewareConsumer) {
    consumer.apply(LoggerMiddleware).forRoutes('*');
  }
}.forRoutes(...):'cats',CatsController,{ path: 'cats', method: RequestMethod.GET }등을 준다..exclude(...)로 제외할 경로를 뺀다.- 와일드카드는 Express 5(path-to-regexp 8) 문법을 따른다. NestJS 11부터
'cats/*splat'처럼 이름을 붙이고,cats/자체까지 포함하려면'cats/{*splat}'로 쓴다. 익명 와일드카드('cats/*','ab*cd')는 쓰지 않는다. (NestJS Middleware 문서)
Interceptor
인터셉터는 NestInterceptor 인터페이스를 구현한 @Injectable() 클래스로, 컨트롤러 핸들러 실행 전과 후 양쪽에 로직을 끼워 넣을 수 있다. 관점 지향 프로그래밍(AOP)에서 영감을 받았다.
AOP(Aspect Oriented Programming)
로깅, 응답 포맷, 실행 시간 측정, 캐싱처럼 여러 기능(세로 기둥)에 공통으로 걸쳐 있는 횡단 관심사(cross-cutting concern)를 각 기능 안에 흩어 쓰지 않고 하나의 모듈로 분리해 모듈성을 높이는 패러다임이다.
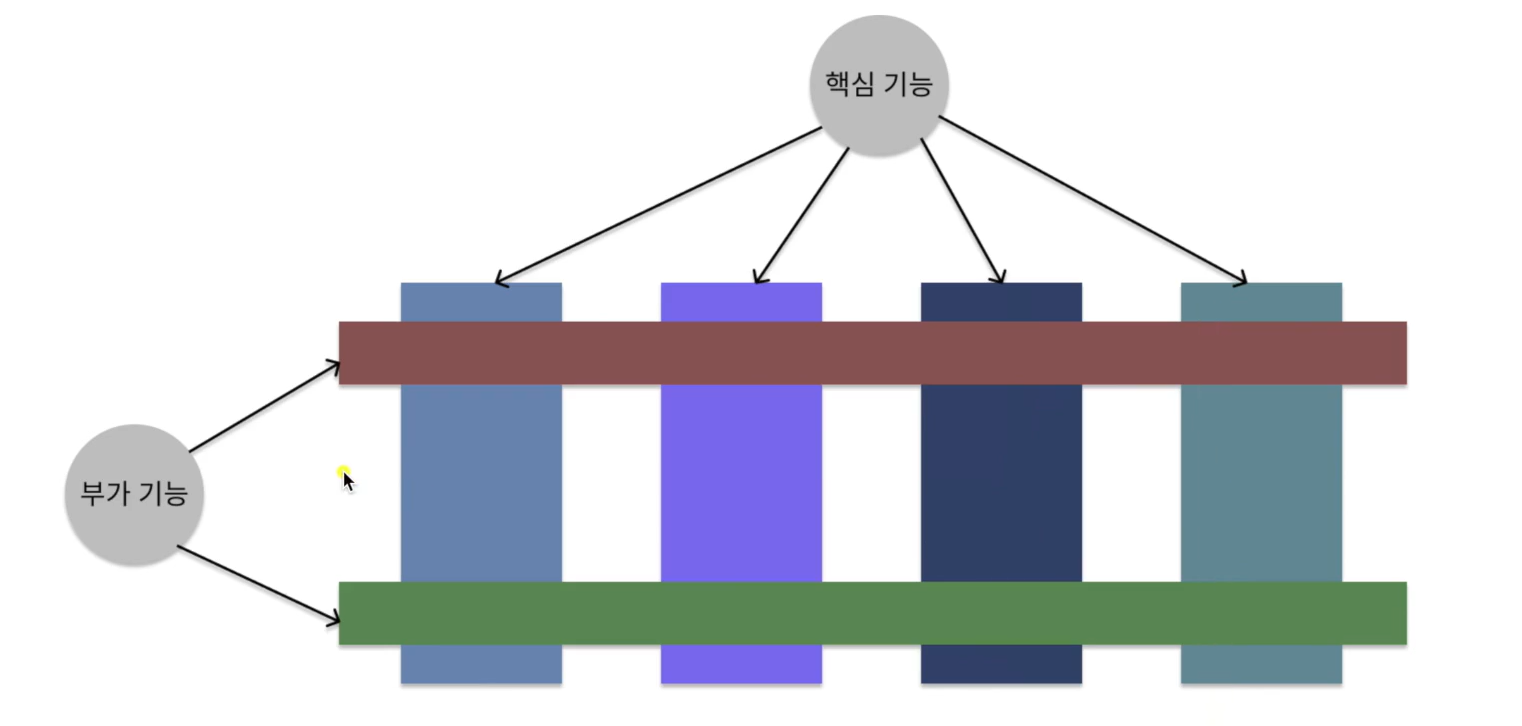
실행 시간 측정 인터셉터
// common/interceptors/logging.interceptor.ts
import { CallHandler, ExecutionContext, Injectable, NestInterceptor } from '@nestjs/common';
import { Observable } from 'rxjs';
import { tap } from 'rxjs/operators';

@Injectable()
export class LoggingInterceptor implements NestInterceptor {
  intercept(context: ExecutionContext, next: CallHandler): Observable<any> {
    console.log('Before...');               // 핸들러 실행 전 (pre-controller)
    const now = Date.now();
    return next
      .handle()                              // 실제 핸들러 실행
      .pipe(tap(() => console.log(`After... ${Date.now() - now}ms`))); // 실행 후
  }
}next.handle()을 호출해야 핸들러가 실행되고, 그 결과가 RxJSObservable로 돌아온다..pipe()안의 연산자로 결과를 관찰(tap)하거나 변형(map)한다.
성공 응답 형식 통일하기
Exception Filter가 실패 응답을 통일한다면, 인터셉터로는 성공 응답을 통일할 수 있다.
// common/interceptors/success.interceptor.ts
@Injectable()
export class SuccessInterceptor implements NestInterceptor {
  intercept(context: ExecutionContext, next: CallHandler): Observable<any> {
    return next.handle().pipe(map((data) => ({ success: true, data })));
  }
}@Controller('cats')
@UseInterceptors(SuccessInterceptor)
@UseFilters(HttpExceptionFilter)
export class CatsController {
@Get()
getAllCat() {
return { cats: 'get all cat api' };
}
}
// 응답: { "success": true, "data": { "cats": "get all cat api" } }적용 범위는 필터와 같다: 메서드·컨트롤러(@UseInterceptors), 전역(app.useGlobalInterceptors()).
인터셉터는 Guard 다음, Pipe 앞에서 한 번(전처리), 핸들러 실행 뒤 Exception Filter 앞에서 한 번(후처리) 실행된다.
Middleware와 Interceptor의 차이
| Middleware | Interceptor | |
|---|---|---|
| 실행 시점 | 생명주기 맨 앞, 핸들러 실행 전만 | 핸들러 실행 전과 후 모두 |
| 실행할 핸들러 정보 | 모름 | ExecutionContext로 어떤 컨트롤러·메서드인지 앎 |
| 반환값 가공 | 불가 | map 등으로 가능 |
| 주 용도 | 요청 로깅, 바디 파싱, 공통 헤더 | 응답 포맷, 실행 시간, 캐싱, 타임아웃 |
핵심 정리
- 미들웨어 =
NestMiddleware를 구현한 클래스의use(req, res, next). 모듈의configure(consumer)에서apply().forRoutes()로 경로에 연결한다. - 인터셉터 =
intercept(context, next)에서next.handle()을 감싸는 구조. - 전·후 처리가 모두 필요한 횡단 관심사(AOP)에 쓴다.
- 성공 응답은 인터셉터, 실패 응답은 Exception Filter로 형식을 맞추면 API 응답이 일관된다.